How To Play Civilization 5 On Your Mac With WineBottler

Hello, gentle reader. Since the publishing of this post, Aspyr has ported Civilization 5 to Mac OS X. That means you can just Buy Sid Meier’s Civilization V for Mac OSX on Amazon. The information that follows is left intact for historical purposes.


The following how to was written for Intel Macs running Mac OS 10.6. It will probably not work if either of those two prerequisites are not met. The test machine is a 2.4ghz Macbook Pro with a GeForce 8600M GT and 4gb of RAM. Your mileage, as always, may vary.


The advances in virtualization software in the past 5 years have made it possible to enjoy PC-only games on your Mac legally, even new releases, without needing to install Windows. Leading the Windows virtualization push is a project called Wine. Wine is an open source project, and as is so often the case it suffers for lack of a user interface, which can make it a non-starter for those who prefer not to use the command line. But from the wasteland there comes a developer named Mike Kronenberg, who has created a Mac OS X native application called WineBottler.

WineBottler handles the deeply unpleasant process of creating a Windows virtualization space for applications (called a Bottle. Get it?) on your Mac with minimal fuss for the user. Using WineBottler I was able to install Steam, purchase Civilization 5, install the game and play it in about the same amount of time it would’ve taken on a native Windows computer. Here’s how.

Step 1: Hit The Bottle

Installing WineBottler is as simple as installing any other Mac OS X application. Go to the WineBottler website, and download the Disk Image. Once it’s downloaded, mount the disk image and drag WineBottler to your Applications folder. Once WineBottler has been copied to your Applications folder, double-click the icon to launch it. It’ll look something like this:
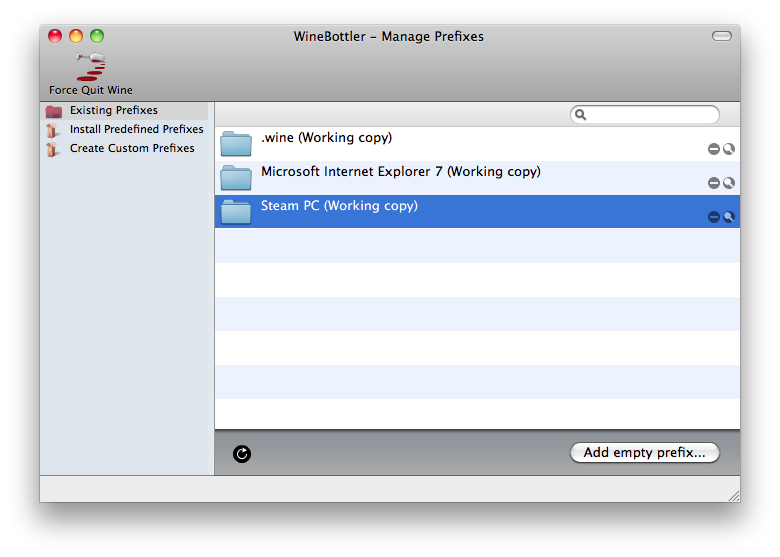
Your window won’t have the extra entries in the right pane that mine does, which are Bottles I’ve made in the past. Don’t panic. To create your “Bottle” for Civilization 5, click the Create Custom Prefixes item in the sidebar on the left. This screen is a little less friendly, but don’t worry, we’ll be out of it soon. For now hide or minimize the WineBottler window, as there’s something we have to do first.

Step 2: Steam

Steam is the distribution platform that Civilization 5 uses. If you want to play Civilization 5 legally, the only way to do it is through Steam. Lucky for us, Steam is free. Go to Steam’s download page, and click the link that reads “also available for Windows” to download the installer. Once it’s downloaded, open up your WineBottler window then click and drag the SteamInstall.msi file onto text field labeled Install File. You don’t have to change anything else on this screen, so click the Install button in the bottom right.

A Save As box will drop down from the WineBottler window. Type in Steam PC for the name, for the Where field select your Applications folder then click Save. WineBottler will start installing Steam. Soon you’ll see the Steam installation window, and if you’ve ever used a PC before then you’ll know what to do. If not, it is simple: Just keep clicking Next in the bottom right of the screen, and eventually click Finish. The WineBottler window and progress bar will stay on screen while Steam installs and runs for the first time, so don’t freak out if it won’t leave.

Once Steam updates (it does so automatically on it’s first launch), go ahead and close the Steam login window. This will let WineBottler know that Steam installed correctly and we don’t need to see WineBottler’s window anymore. WineBottler will prompt you as to which Executable you’d like to run when your launch your Steam PC application. From the menu select steam.exe and click OK.

Step 3: Try The Demo and Buy Civ 5

Now that we’re all done with WineBottler, just go to your Applications folder and double-click the icon labeled Steam PC. You can log in to Steam or create a Steam account form there, and buy Civ 5 or download the Demo just like any other user. Once the game is downloaded it will take awhile to install, primarily the portion where the installer is fetching DirectX. This can take up to 10 minutes, and you might worry that your app has frozen. It hasn’t.

When it comes time to launch Civ 5, select the DirectX 9 option. When the game launches the window will be complete white for a minute or two due to some weirdness with the introduction video. This is totally normal, so don’t panic. After about one minute of the white screen you’ll see the game’s welcome screen and be well on your way to getting your ass handed to you by Montezuma.

Fake: “Mac OS X Web Browser Automation and Webapp Testing Made Simple.”

Version 0.2 just launched, and it be impressive:

Inspired by Apple’s Automator application, Fake looks like a combination of Safari and Automator and allows you to run (and re-run) “fake” interactions with the web.

Power Users will love Fake for automating tedious web tasks like filling out lengthy forms and capturing screenshots. Developers can use Fake for graphically configuring automated tests for their webapps, including assertions.

Like Automator and Safari got married and made the most beautiful baby. This is already The Best Thing.

How To Enable Extensions For Safari 5

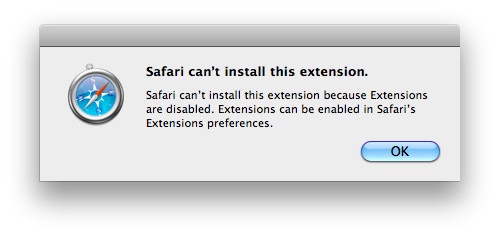
If you, like me, have tried to install a Safari 5 extension such as Coda Notes, and were met with the following dialog:

and then spent 5 minutes looking through Safari’s Preferences window to no avail, this is how you enable Extensions on Safari 5:

  1. Open Preferences
  2. Click Advanced
  3. Click Show develop in menu bar
  4. Close and reopen Safari
  5. Click the Develop menu item
  6. Finally, click Enable Extensions

Viola.

“Steam Is a Port”

John Bell on Steam’s Mac version, and cross-platform UIs in general. As I did in my post on Steam, he sees it as an example in favor of Apple’s stance on third-party SDKs in the App Store:

Apple has their head on straight with regards to ports. They want apps to be designed with iPads and iPhones in mind. If that means half the apps, that’s fine. PC computing never had trouble with sheer numbers of apps, it had trouble with quality. Apple is willing to give up some of the former for a lot of the latter.

via Lukas Mathis

On Steam for Mac OS X

  • Steam for Mac, while a welcome panacea against the 17 or 20 Windows users who were clinging to the last hope of their platform (“Macs don’t have any games!”), is not yet a first-class Mac OS X citizen. As a cross-platform system, it is completely expected, and normal, that there are going to be conventions that apply and “fit” in one platform but do not in another. We can’t forget that Steam is a primarily a PC games platform that is inching it’s way toward being the games platform.

  • Steam is, in a strange way, a great example of Apple’s own thinking (and primary justification) regarding allowing third-party SDK use on the iPhone and iPad platforms. Namely: They’ve created this software that doesn’t feel, in this case, “Mac-like”, or in the broader sense “Apple-like”. Apple has no say in the look-and-feel of Steam. They can’t chastise Valve for Steam’s refusal to work with Spaces (go ahead, try control+clicking Steam and dragging it into another space). It’s a small example, but it grates on someone who uses Macs all day long and expects this stuff to just work.

  • As a Mac user and a gamer, having Steam on the Mac is great. I’ve spent about $100 on it already. As someone who cares about how things work, Steam is a very PC-feeling application. My gut says many of the explicitly non-Mac design conventions in the Steam application aren’t going anywhere: the strange, dark, non-round-rect windows. Their inexplicable use of ~/Documents to store games and game data. The “Updating Steam” progress window that uses Geneva instead of Lucida Grande (yeah, I noticed). The tiny, non-standard, UI controls.

  • As for the rest, I hope Valve makes enough money off of Mac users to justify improving the client into something that more resembles the beautiful, usable, interfaces we’ve become accustomed to. At any rate, it’s good to have Valve on board.

How To: Automatically Backup Your 1Password Keychain Offsite With Dropbox

Since the writing of this post, 1Password has added built-in Dropbox syncing as a feature. As such, the following information is no longer useful and is left intact for historical purposes.


The following post was inspired by the recent postings of Merlin Mann and John Gruber RE: Why you need to be backing up your stuff as often as possible. If you haven’t, you really should give ’em a read.

If you’re as avid a user of the excellent password/login-storing app 1Password as I am, you probably spend a decent amount of time trying not to think about what might happen to you if the application or it’s database were to suddenly go bad.

Ah, you’re probably thinking about it now, huh? Sorry about that. Like the game, important data loss is not something you want occupying your brainspace, and yet there it is. Waiting. I come here not to terrifying you, though I may do that on purpose later if there’s time, but to help you out. You might not know it, but 1Password provides a daily keychain backup function from within the 1Password itself, and when melded to the also-excellent Dropbox online backup and file sharing system, it can be made to automatically backup your 1Password database offsite, for free. Here’s how.

Get ‘Er Accomplished

Prerequesite Um, I am assuming you use Mac OS X and 1Password already. If not, you can pretend none of this ever happened. I won’t hold it against you. Much.

  1. Download and signup for Dropbox. Install that shit.

  2. Navigate to Your Home Folder → Dropbox and create a folder called 1Password.

  1. Open 1Password, and click Preferences in the application menu.

  2. Click the Backup tab in the preferences window, and then the folder-selection box under Backup Folder.

  3. Select the 1Password folder you created in step 2. Click the poorly-named “Open” button in the bottom right of the window, or just hit return. Either of these will save you selection.

  1. Click Backup Now to make sure it works. Wait a minute. If it works, 1Password will open a Finder window with your newly backed-up files.

  2. Close 1Password.

  3. Sleep the sleep of the just.

You’re welcome. Comments can be sent to comments at the domain this post is on, and cash gifts can be sent to me right here.